Adapting the brood frame
Using the Jenter Kit
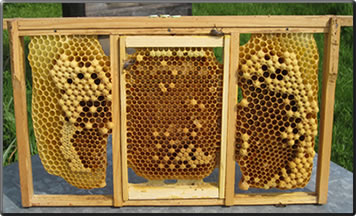
An empty brood frame is adapted to take the Jenter cage. Two vertical wooden struts are fixed to the frame so that the kit push-fits in place. (A second such frame is also made for use later in the operation).
To prepare the frame for use the central part (where the Jenter would eventually go) is fitted with a push-fit small frame containing worker foundation. The two outside areas are left empty so that the bees can build drone comb.
This frame is placed in frame position 4 in the chosen colony in the third week of March so that mature drones would be available for queen mating from mid May.
Because drone brood needs more space than worker brood, this frame should be spaced a little wider than the other worker frames.
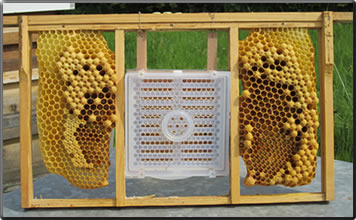
The Jenter Cage
In the third week in June this special brood frame is removed and the central mini frame, now containing worker brood, is exchanged for the Jenter cage. The frame is replaced in the hive for the next 24 hours so that the bees become familiar with the Jenter cage.
The mini frame with the worker brood is placed in the second brood frame (prepared as above) and placed at the edge of the brood nest (frame 7).
To prepare the frame for use the central part (where the Jenter would eventually go) is fitted with a push-fit small frame containing worker foundation. The two outside areas are left empty so that the bees can build drone comb.
This frame is placed in frame position 4 in the chosen colony in the third week of March so that mature drones would be available for queen mating from mid May.
Because drone brood needs more space than worker brood, this frame should be spaced a little wider than the other worker frames.
The Jenter Cage
In the third week in June this special brood frame is removed and the central mini frame, now containing worker brood, is exchanged for the Jenter cage. The frame is replaced in the hive for the next 24 hours so that the bees become familiar with the Jenter cage.
The mini frame with the worker brood is placed in the second brood frame (prepared as above) and placed at the edge of the brood nest (frame 7).
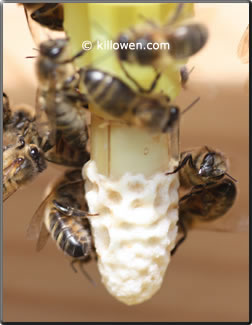
A nicely formed queen cell seen
on the cell bar frame on day 10
on the cell bar frame on day 10
Transferring the royal larvae
At 10 am (day 4) the Jenter cells containing the royal larvae are removed and fitted to the plastic plugs on the cell bar frame. This is then immediately replaced in the Harden box and left for 10 days. A check is made after 5 days to ascertain if indeed any queen cells had been formed. A check is also made on the open brood frame just in case queen cells had been started here. In this case only 5 queens cells were formed on the bottom cell bar, one of which is shown in the photo on the left.
Once sealed the queen cells are fitted with cell cages just in case the bees decide to tear them down.
Making up the nucs
On day 12 three frame nucs are made up. Each nuc consisting of one frame of sealed brood sandwiched between two frames of pollen. A queen cell is introduced to each nuc on the 14th day; the queen emerging two days later (day 16).
The overall timetable
A timetable summarizes the method as a pop-up
Introducing the Queen
The next day at 6 pm the queen mother is found and sealed in the Jenter cage (day 0).
(It is important that there are no workers in the cage otherwise the queen could be attacked and killed. It is difficult to understand why the workers would want to attack their own queen but this has been learnt by experience.)
Exactly 24 hours later again at 6 pm (day 1) the queen is removed after laying up the kit with eggs. The frame is replaced in the brood nest and left for 3 days and overnight
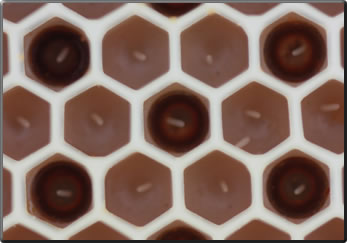
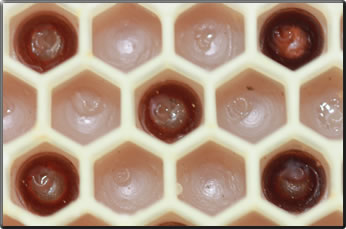
Larvae seen on the 4th day in the brown Jenter cells just before insertion into the cell holders.
The tiny drops of royal jelly in each cell are reflecting the light.
The tiny drops of royal jelly in each cell are reflecting the light.
Eggs seen standing upright in the Jenter cells after
the removal of the queen after 24 hours.
The dark cells are the removable cell plugs..
the removal of the queen after 24 hours.
The dark cells are the removable cell plugs..
Grafting and one day old larvae
Finding one day old grubs using the Jenter kit is fairly easy. If, however, grafting is the preferred method of forming queen cells, then it is sometime difficult to find these larvae on the day when grafting is to be performed. A technique which ensures larvae of the correct age are formed on the required day is to put a frame of drawn comb in the middle of the brood nest 6 days before grafting. The bees require 2 days to prepare the frame for the queen to lay the eggs. The eggs hatch after 3 days and a further day is required for the grubs to reach the required age. On the 6th day the grubs can be grafted into a Jenter cell.
Finding one day old grubs using the Jenter kit is fairly easy. If, however, grafting is the preferred method of forming queen cells, then it is sometime difficult to find these larvae on the day when grafting is to be performed. A technique which ensures larvae of the correct age are formed on the required day is to put a frame of drawn comb in the middle of the brood nest 6 days before grafting. The bees require 2 days to prepare the frame for the queen to lay the eggs. The eggs hatch after 3 days and a further day is required for the grubs to reach the required age. On the 6th day the grubs can be grafted into a Jenter cell.